Fall frame with tools tutorial
=====================
El contorno ©tatipixel.com puedes utilizarlo para hacer firmas, sigtags, adopciones....
Le contour ©tatipixel.com, vous pouvez l'utiliser pour en faire une signature, une adoption...
This outline ©tatipixel.com, you can use it to make a sigtag, adoption..
Descargar el material aquí
Téléchargez votre matériel ici
Your supplies are here
Por favor, siempre crédito a http://design.cuquialonso.es/SildabiaBP
S'il vous plaît, donnez crédit à
SildapiaBP à http://design.cuquialonso.es/SildabiaBP
Please, give credit to SildapiaBP at http://design.cuquialonso.es/SildabiaBP
Si usted utiliza su resultado para hacer IMLetters, credito a http://tatipixel.com también.
Si vous utilisez vos résultats à IMLetters, le crédit au http://tatipixel.com bien.
If you use your results to IMLetters, credit to http://tatipixel.com well.
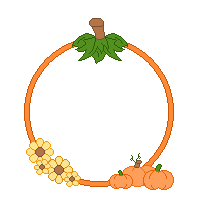
1.- Abre TP_Out_Pumpkin_Frame y rellena with white color
1 .- TP_Out_Pumpkin_Frame Ouvrir et remplir de couleur blanche
1 .- Open TP_Out_Pumpkin_Frame and fill with white color
2.- Vamos a reemplazar todos los colores de la outline por color #352421
2 .- Nous allons remplacer toutes les lignes d'coloresr # 352421
2.- We will replace all of the outline coloresr to #352421
Nota: Si no quieres aprender a reemplazar el color de la outline, abrir 'ready-outline-for-work.gif' y salta al paso número 4.
Remarque: Si vous non voulez apprendre à remplacer la couleur du contour, ouvrez 'ready-outline-for-work.gif' et passez à l'étape 4.
Note: If you want to learn to replace the color of the outline, open 'ready-outline-for-work.gif' and skip to Step 4.
* tip: Cuando tu quieras cambiar un color, mientras trabajas, presiona CTRL y obtienes el 'cuentagotas'
* tip: Quand vous voulez changer une couleur en appuyant sur CTRL obtenir le "gouttes" que vous travaillez.
* tip: When you want to change a color by pressing CTRL get the 'dropper' as you work.
Coje herramienta 'reemplazar color'.
Situa el cursor en el borde del lineart
CTRL + click derecho del ratón. = color de fondo
CTRL + click izquierdo del ratón. = color de primer plano
(mira en tu paleta de material como cambia el color al hacer esto)
Attrape outil "remplacer la couleur".
Placez le curseur sur le bord du lineart
CTRL + clic droit de la souris = Couleur de fond
CTRL + clic gauche de la souris =Couleur de premier plan
(Regardez dans votre palette de matériaux et de changer la couleur pour ce faire)
select tool 'replace color'.
Place the cursor on the edge of lineart
CTRL + right mouse click. = Background color
CTRL + left mouse click. = Foreground color
(look in your material palette and change the color to do this)
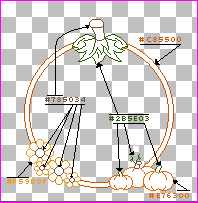
3.- colores de segundo plano: #C85500 #2B5E03 #E76300 #F59B0F #785034
Color de primer plano: #352421
Son 5 cambios de color (has de hacerlos de uno en uno). Tu obtienes esto:
3.- Couleur de fond: #C85500 #2B5E03 #E76300 #F59B0F #785034
Couleur de premier plan
#352421
Il ya 5 change de couleur (que vous avez à faire un à la fois). Vous obtenez ceci:
3.- 3 .- Background color: # C85500 # E76300 # F59B0F 2B5E03 # # 785034
Foreground color: # 352421
There are 5 changes color (you have to make them one at a time). You get this:

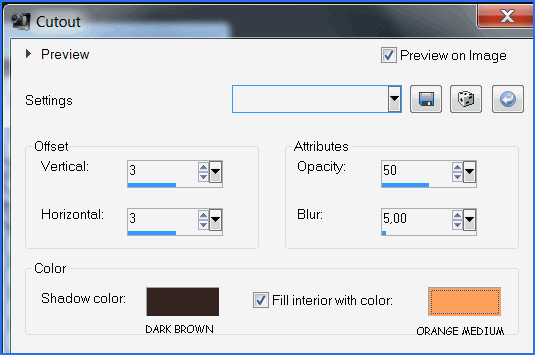
4.- Selecciona con la varita mágica el interior del frame
4.-
avec la baguette magique sélectionner l'intérieur du cadre.
4.- with the magic wand select inside the frame.
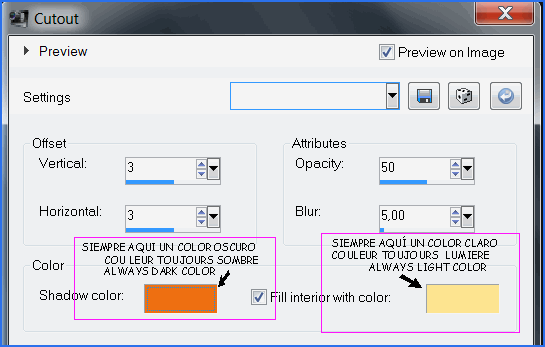
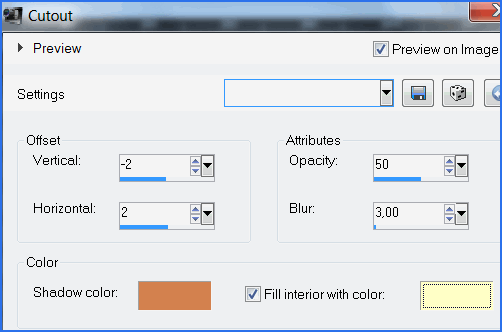
Efectos/3DEfectos/Recorte y añade estos valores
Efectos/3DEfectos/Recorte et ajoute ces valeurs
Efects/3DEfects/Cutout
and add this settings
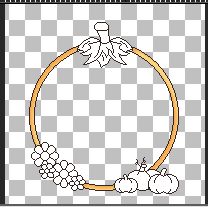
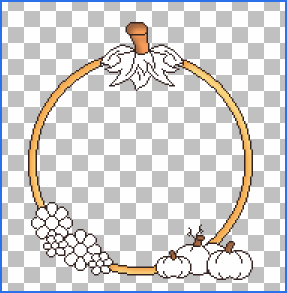
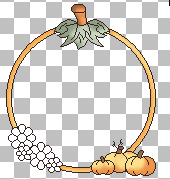
5.- resultado 5.- resultat 5.- result
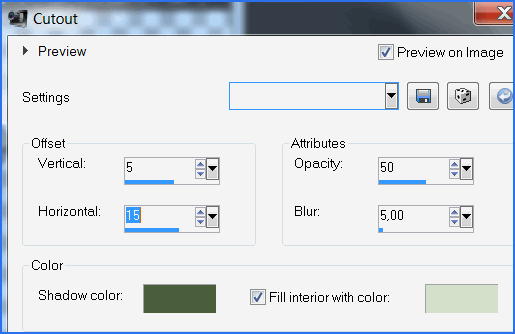
6.- Selecciona con la varita mágica el interior de los tallos.
6.-avec la baguette magique sélectionner l'intérieur des tiges.
6,. With magic wand select inside of
stems
recorte - coupure - cutout...
resultado - resultat - result
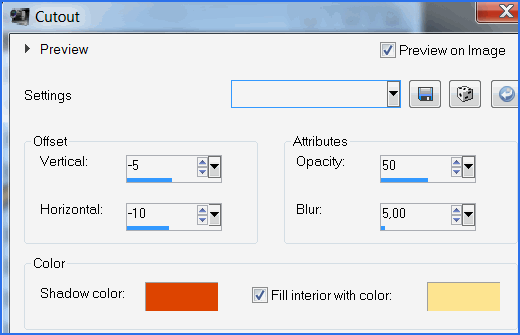
7.- Selecciona con la varita mágica el interior de las hojas.
7.-avec la baguette magique sélectionner l'intérieur des feuilles..
7,. With magic wand select inside of
leaves.
recorte - coupure - cutout...
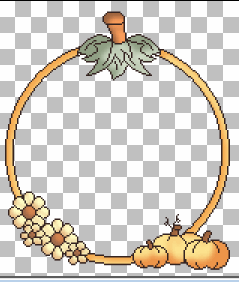
....

8.- Selecciona con la varita mágica el interior de las calabazas..
8.-avec la baguette magique sélectionner l'intérieur des potirons..
8,. With magic wand select inside of
pumpkins.
recorte - coupure - cutout...
you get...
9.- Selecciona con la varita mágica el interior del polen de la flor..
9.-avec la baguette magique sélectionner l'intérieur des pollen de fleurs.
9,. With magic wand select inside offlower pollen.
recorte - coupure - cutout...

10.- Selecciona con la varita mágica el interior de los pétalos.
10.-avec la baguette magique sélectionner l'intérieur des pétales..
10,. With magic wand select inside offlower petals..
recorte - coupure - cutout...
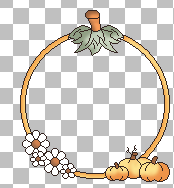
resultado - resultat - result
Fin - the end
Tu puedes añadir el frame a una imagen de tu agrado.
Vous pouvez ajouter du contexte à une scène à votre convenance.
You can
add the frame to image of you like.
10.- Mi resultado. 10.- Mon résultat. 10.- My result

Yo espero hayas disfrutado con este tutorial. Puedes añadir una bonita escena. En la mía, tubos de CB
J'espère que vous avez apprécié ce tutoriel. Vous pouvez
y ajouter d'autres éléments pour créer une belle scène.
J'ai rajouté des tubes de CB
I hope you had fun with this tutorial. You can add
other elements and create a beautiful scene. In mine, I
added tubes from CB
>>RESULTS PAGE<<
Tutorial by PNL - http://www.sildabiabp.com